| |
|
| |
Definition |
| |
This Stylus Size Update math function inside the Feature
Selection Tool, is designed to update the size of the
current qualified stylus based on previously measure
Ring Gages.
Under normal operations, the ball
stylus is qualified against a known reference sphere.
During this qualification process the stylus size and
location is calculated. Under most conditions, the
reference sphere qualification process is sufficient for
all general inspection requirements.
However,
measure a known ring gage and the measured diameter
normally will be different than the stated ring gage
size. This happens due to variations in probe design and
usage. When qualifying against a reference sphere, the
bottom of the probe will trigger at a different
pre-travel distance than a point taken at its equator.
The Ring Gage Re-Qualification tool uses only
readings around the equator to calculate a high accuracy
diameter of the stylus. The result will only update the
size of the stylus, not the 3D location. It is
recommended that the Ring Gage be measured several times
as separate records. The math tool will then average all
selected Ring Gage features for a more accurate
solution. |
| |
|
| |
Setting up the ring gage |
| |
For greatest accuracy,
set the ring gage directly on the CMM surface
plate or elevated using parallels. Set a Part
Coordinate System directly on the Ring Gage with
the origin in the center.
Measure the
Ring Gage multiple times. The average of all
inspection results will be used when determining
the stylus tip diameter.
|
| |
|
| |
Calculating
the Stylus Diameter |
| |
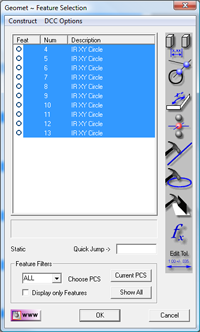
Select the
measured results of the Ring Gage in the
inspection report. Activate the Feature
Selection tool
to access the math functions.
Select the
measured results of the Ring Gage in the
inspection report. |
 |
|
| |
Activate the Feature
Selection tool
to access the math functions.
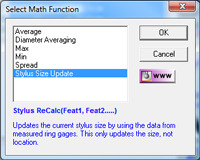
Press the 'fx'
button to access Math Functions. Select "Stylus
Size Update" and press the

button.
|
 |
|
| |
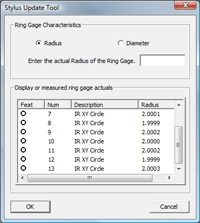
In the Stylus
Update Tool, select the Ring Gage nominal of
Radius or Diameter using the button selectors.
Enter the Rang Gage nominal and press the
 button. button.
|
 |
|
| |
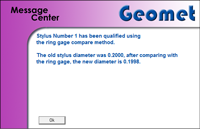
A message will be
displayed showing the original stylus diameter
and the new calculated size. Press  button to complete the process.
 |
 |
|
| |
Precautions |
| |
Care should be
taken to understand that updating the stylus
size using the Ring Gage method does not correct
for XYZ offset between the reference stylus,
normally number 1 and the current stylus.
Using the Rang Gage method is best suited
when measuring features that require high
accuracy and generally working in the same plane
as the orientation of the Ring Gage.
The
use of the Ring Gage calibration method is not
recommended for use on manual CMMs. Touch Probes
and CMM hysteresis greatly affects the
repeatability. If the operator has a consistent,
even movement in capturing data points, then
these errors are reduced. To better understand
CMM system limitations, please review
Tech Note 2,
Multi-Point Feature and CMM Inherent Errors. |
| |
Stylus Manager, Features, Menus and Support Tools |
| |


