|
|
|
|
| |
|
| |
Definition |
| |
Before Geomet can perform an inspection, there must be at least one qualified stylus in the current stylus database. Geomet requires the size and location of the stylus to correctly apply stylus compensation to measured features.
The qualification process is designed as a step-by-step process that will provide clear instructions to the operator for each process required to complete the qualification. For example: The qualification of a single stylus using an electronic touch probe, such as the Renishaw TP-ES, requires only two steps. Those steps are the selection of a ball style qualification, followed by the actual capturing of data points on a reference sphere.
A more complicated qualification may include a PH10 motorized probe head. The qualification process will automatically
configure itself to include a tool to select the A / B angles of the motorized probe head prior to capturing data points.
The qualification process is determined by the hardware attached to your CMM. To review how Geomet is configured for your attached hardware.
|
| |
Qualify a Stylus based on hardware configuration |
| |
Based on your CMM configuration, choose the Probe System
configuration to view the appropriate Qualify a Stylus
help page.
- Basic Ball Style Electronic Touch Probe
- Motorized Probes (PH9, PH10)
- Renishaw RTP20 Probe Head
|
- Qualifying Styli Clusters, Manual Heads
- Motorized Probes with Stylus Racks
|
|
| |
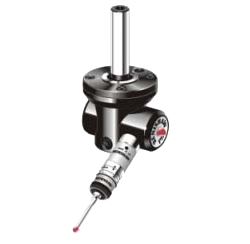
Basic Ball Style Electronic Touch Probe |
| |
| This Qualification
example is based on the hardware configuration
consisting of a ball stylus touch probe on a
electronic probe head. These might include the Renishaw TP-ES or a PH1 with a TP2 probe body. |
 |
|
| |
Step 1 |
| |
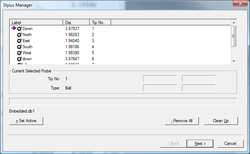
To start the
qualification process, activate the stylus
manager by pressing the<w> key on the
keyboard or the [Qualify→Stylus
Manager] from the drop down menus.
NOTE: Qualifying a stylus or Re-Qualifying a
stylus are both initiated from the Stylus
Manager. If you have a stylus record
highlighted, the process becomes a Re-Qualify.
In this example ensure no current styli are
highlighted before moving to the next operation.

To Proceed, press the <Next> button. |
 |
|
| |
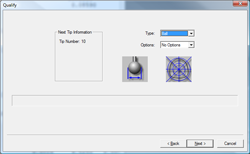
Step 2 |
| |
The next step will prompt you to enter the qualification type. This describes the type of stylus attached to your system. The choices are ball, taper, cylinder, video cross hair and manually entered diameter.
Choose Ball (default choice). I you are using
the default, no selection is required.
Proceed to the Qualify operation by pressing the
<Next> button. |
 |
|
| |
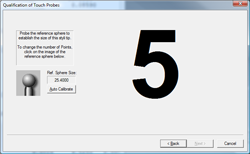
Step 3 |
| |
The final step
will prompt you to proceed capturing the
prompted number of data points on the Reference
Sphere to solve the qualification of the current
stylus.
|
 |
|
| |
Tip: |
| |
Geomet provides many access methods to commonly used
features. In the case of Qualifying, the <Next> button
is mapped to the <Enter> key of your keyboard. To
efficiently launch the Stylus Manager and Qualify a new
Stylus use these simple keystrokes:
<w> + <Enter> + <Enter>
That is all that is required! No mouse......no menus!
<w> Launches the Stylus Manager
<Enter> Moves forward to the Qualification Type page.
<Enter> Moves to the capture data points page. |
| |
Stylus Manager, Features, Menus and Support Tools |
| |
|